
Garage door keypad blinking

Garage door keypad blinking: 5 Causes and Quick Fixes

Garage Door Keypad Blinking: What It Means and How to Fix It

A blinking garage door keypad is one of the more common service calls we receive at CallOrange Garage Door Repair in Phoenix. The blinking light is your keypad’s way of signaling that something needs attention, and in most cases, the fix takes only a few minutes. This guide walks you through the most likely causes and the steps you can take before calling a technician.
Why Is Your Garage Door Keypad Blinking?

Keypad manufacturers use blinking patterns to communicate specific error states. The number of blinks, the color of the light, and whether the blink is continuous or intermittent all point to different problems. Before you assume the keypad is faulty, work through the following common causes in order from simplest to more involved.

Keypad Blinking Causes: Quick Diagnosis Guide

Cause Blink Pattern Fix Time to Resolve
Low or dead battery Slow or intermittent blink Replace battery with fresh unit 2 to 5 minutes
Lock-out mode Continuous rapid blink Wait 30 to 60 seconds, re-enter correct PIN 1 to 2 minutes
Lost programming Blinks but door does not move Reprogram via Learn button on motor unit 5 to 10 minutes
Signal interference Blinks intermittently, door response inconsistent Reposition keypad or add antenna extension 10 to 20 minutes
Faulty hardware Irregular or random blink pattern Replace keypad unit 30 to 60 minutes

Low or Dead Batteries

Weak batteries account for the majority of keypad blinking issues. Most keypads run on a single 9-volt battery or two AA batteries. When voltage drops below the operating threshold, the keypad blinks to signal that it cannot hold a stable connection with your opener’s receiver.

  • Open the keypad cover and remove the existing battery.
  • Install a fresh battery from a new pack, not one pulled from another device.
  • Test the keypad by entering your PIN and observing whether the blinking stops.

In Phoenix’s summer heat, battery drain accelerates faster than in milder climates. Temperatures inside a garage can reach 120°F or higher in August, which shortens battery life by 30 to 50 percent compared to manufacturer estimates. Replacing keypad batteries every six months keeps this problem from catching you off guard.

PIN or Lock-Out Mode Activation

Many keypads enter a temporary lock-out mode after a set number of incorrect PIN entries, typically three to five attempts. During lock-out, the keypad blinks continuously and ignores all input for 30 to 60 seconds. This is a built-in security feature.

If you or someone in your household entered the wrong code multiple times, simply wait out the lock-out period and then try again with the correct PIN. If you have forgotten your PIN, you will need to reprogram the keypad using the “Learn” button on your garage door opener motor unit.

Signal or Programming Issues

A keypad that blinks but does not trigger the door may have lost its programming connection with the opener. This can happen after a power outage, after replacing the opener’s backup battery, or after another remote or keypad was programmed using the same Learn button sequence.

How to Reprogram Your Keypad

  • Locate the “Learn” button on your opener’s motor head. It is usually colored orange, purple, or yellow depending on the brand.
  • Press and release the Learn button. The indicator light on the motor unit will illuminate for about 30 seconds.
  • Within those 30 seconds, enter your desired PIN on the keypad and press the Enter or Send button.
  • The opener should click or the lights should flash to confirm the new code has been accepted.
  • Test the keypad twice to confirm the door opens and closes reliably.

If the keypad still blinks after reprogramming, interference from nearby electronics or a neighboring opener operating on the same frequency may be disrupting the signal. Repositioning the keypad slightly or installing an external antenna extension on the motor unit often resolves frequency-based interference.

Faulty Keypad Hardware

Keypads exposed to Phoenix’s extreme summer heat and UV radiation degrade faster than average. Plastic housings crack, membrane keypads delaminate, and internal circuit boards can warp over time. If your keypad blinks in an irregular pattern that does not match any standard lock-out or low-battery sequence, the unit itself may be failing.

Signs that the keypad needs replacement rather than troubleshooting include buttons that register inconsistently, a cracked or discolored housing, moisture visible behind the lens, and blinking patterns that appear random. Replacement keypads are available for most major opener brands including LiftMaster, Chamberlain, Genie, and Linear, and installation typically takes under 20 minutes.

When to Call a Technician in Phoenix

A blinking keypad sometimes signals an issue with the opener itself rather than the keypad. If you have replaced the battery, confirmed the PIN, and reprogrammed the unit without success, the problem may lie with the opener’s logic board or receiver module. At that point, a technician can test signal strength, inspect wiring connections, and determine whether a component on the opener needs attention.

CallOrange Garage Door Repair serves homeowners across the Phoenix metro area. Our technicians carry replacement keypads and opener components on every service vehicle, which allows most repairs to be completed in a single visit.

Get Your Keypad Working Again Today

If your garage door keypad is still blinking after working through the steps above, the team at CallOrange Garage Door Repair is ready to help. We hold a 4.9-star rating across 48 Google reviews, and we schedule service calls for homes throughout Phoenix and the surrounding communities.

Frequently Asked Questions

How do I know if my garage door keypad needs to be replaced or just reprogrammed?

If your keypad blinks in a pattern that matches a known error state, such as low battery or lock-out mode, troubleshooting and reprogramming will usually resolve it. If buttons respond inconsistently, the housing is cracked or discolored, or the blinking appears random and does not stop after fresh batteries and reprogramming, the unit has likely reached the end of its service life and needs replacement. A technician can confirm this with a quick inspection.

Will a power outage permanently erase my garage door keypad’s PIN?

Most modern garage door openers store programmed codes in non-volatile memory, so a brief power outage will not erase your PIN. However, a longer outage combined with a depleted backup battery on the opener can sometimes reset stored codes. If your keypad stops working after a power event, run through the reprogramming steps using the Learn button on your motor unit before assuming anything is damaged.

Can extreme heat in Phoenix permanently damage a garage door keypad?

Prolonged exposure to Phoenix summer temperatures can warp the internal circuit board, delaminate membrane buttons, and cause the plastic housing to crack or discolor. UV radiation adds to this wear by degrading the outer casing over time. Keypads installed in direct sunlight tend to fail sooner than those mounted in shaded locations, so positioning matters when you install or replace a unit.

How often should I replace the batteries in my garage door keypad if I live in a hot climate?

In Phoenix and similar climates, replacing keypad batteries every six months is a reliable schedule because high temperatures accelerate voltage loss significantly. Setting a recurring reminder at the start and end of summer aligns the replacement schedule with the periods of heaviest heat exposure. Using name-brand batteries from a fresh pack, rather than batteries pulled from other devices, also extends the time between replacements.

What should I do if my garage door keypad still blinks after I have tried all the basic troubleshooting steps?

If fresh batteries, a lock-out wait period, and a full reprogramming sequence have not stopped the blinking, the most likely remaining causes are radio frequency interference from nearby electronics or a hardware fault in the keypad itself. You can try repositioning the keypad a few inches or asking your technician to install an antenna extension on the motor unit to improve signal reception. If neither step resolves the issue, contact CallOrange Garage Door Repair for an on-site diagnosis.

Call us at (480) 690-3344 or visit callorange-garage-repair.com to book your appointment. We will diagnose the issue and restore your keypad to full operation so you can get back to your day.

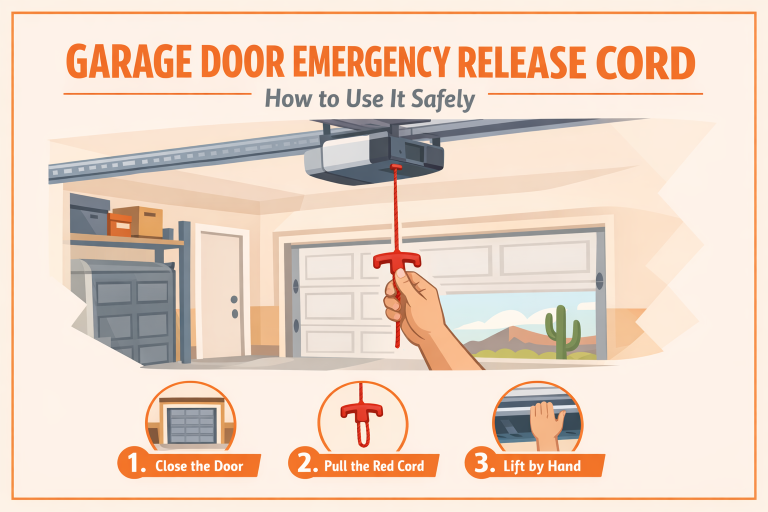
Homeowner pulling the red garage door emergency release cord, with safety steps — CallOrange Garage Door Repair, Tempe AZ

Stuck Inside? How to Use Your Garage Door Emergency Release Cord Safely

The garage door emergency release cord is the bright red rope hanging from your opener’s rail, and it exists for a single purpose: to disconnect the door from the motor so you can raise or lower it by hand when the power is out or the opener quits. Used correctly, it takes seconds. Used at the wrong moment, it can let a heavy door fall.

A summer storm knocks the power out across your Tempe neighborhood, the opener falls silent, and your car is trapped behind a door that won’t budge — with somewhere you need to be. That exact scenario is what the garage door emergency release cord was built for, and pulling it safely is far simpler than most homeowners expect. At CallOrange Garage Door Repair, we’ve coached thousands of Valley households through this moment since 2008. We’ll show you what the red handle actually does, when it’s safe to use, and the one situation where pulling it can cause real harm. If you’d rather have help on the way while you read, you can find our Tempe location on Google Maps.

Garage Door Emergency Release Cord: What It Is and Why Every Door Has One

The garage door emergency release cord is a short rope with a red handle connected to the trolley — the carriage that travels along your opener’s rail and pushes the door up and down. Pulling the handle trips a spring-loaded lever that separates the door’s arm from that trolley, switching the door from powered operation to manual. Once disconnected, the door is no longer held by the motor; it’s held only by its springs, which is exactly why understanding the system before you tug on anything matters.

Every automatic opener sold in the United States — whether it’s a LiftMaster, Chamberlain, or Genie — ships with this release by federal design standard. It’s the same mechanism whether you own a chain-drive unit from the 1990s or a Wi-Fi model wired into your smart home integration. Our factory-trained technicians work with all of them, and the release operates on the same principle across the board.

Where to Find It on Your System

Look up at the rail running from the wall or ceiling motor toward the door. The red handle hangs from a small trolley roughly in the center of that rail. In most homes it dangles six to seven feet off the ground — high enough that it isn’t an everyday object, low enough to reach without a ladder. If you’ve never noticed it, you’re in good company; many of the homeowners who call our garage door service team are surprised it was there all along.

Why Building Codes Require It

The release exists for safety, not convenience. If anyone is ever trapped inside a garage during a fire or power loss, that cord is the manual override that gets the door open. It also protects the opener motor itself — forcing a powered door open or closed can strip the gears and burn out the unit. Knowing how to disengage it cleanly is part of basic home ownership, much like knowing where your water shutoff valve is.

When the Emergency Release Cord Helps — and When to Stop

Situation Safe to Use the Cord? What to Do
Power outage, door looks normal ✓ Yes Release, operate by hand, re-latch when power returns
Opener motor dead, door sits level ✓ Yes Use the cord, then schedule an opener repair
Remote or keypad not responding ✓ Yes Use the cord; check batteries and the opener
Door stuck open, but looks normal ✓ With care Support the door, release, lower it gently
Loud bang, door now crooked or very heavy ✗ No Likely a broken spring — call a professional
Door has come off the track / leaning ✗ No Don’t pull the cord — call a professional
Frayed, loose, or hanging cable ✗ No Stop — cable is under tension; call a pro
Bent panels, hardware, or rollers ✗ No Have it inspected before operating the door

When to Pull the Cord — and the One Time You Shouldn’t

Most of the time, the garage door emergency release cord is exactly the right tool. Reach for it confidently when the power is out, when the opener has died but the door itself looks normal, or when a remote or wall button has failed and you simply need to get the car out. In each of these cases the door is mechanically sound — only the powered drive is offline.

There is, however, one situation that changes everything: a broken torsion spring. Your springs, not the opener, carry the real weight of the door. When a torsion spring snaps — often with a bang loud enough to wake the house — the opener may be the only thing still holding the door up. Pull the release in that moment and the door can drop with enough force to injure anyone beneath it and crack the panels. The same caution applies to a door that has come off its track, a frayed or hanging cable or roller, or visibly bent hardware.

How can you tell? A healthy door sits level, and the springs above it look intact and tightly wound. A door with a snapped spring often hangs crooked, shows a clear gap in the spring coil, or feels impossibly heavy to lift. When anything looks off, leave the cord alone and call our emergency repair team instead.

⚠️ Safety Warning: High-Tension Springs & Electrical Hazards

Garage door torsion springs are wound under extreme tension — enough stored energy to cause severe injury or death if a spring, cable, or winding bar slips. Opener units also connect to 120V AC household wiring. Never attempt to adjust, wind, or replace springs, cables, or opener wiring yourself, and never pull the emergency release on a door you suspect has a broken spring. The U.S. Consumer Product Safety Commission (CPSC) links thousands of garage door injuries each year to spring failures and improper repairs. When in doubt, hire a licensed, insured garage door technician. Every CallOrange technician is licensed, insured, and trained to handle these components safely.

How to Use Your Garage Door Emergency Release Cord Safely, Step by Step

When the door is sound and you’ve ruled out a broken spring, releasing it by hand takes under a minute. Here is the process our technicians teach every customer.

Step 1 — Lower the Door First if You Can

Whenever possible, disconnect the release while the door is fully closed. A closed door rests on the floor, so there’s no stored height for it to fall from and no chance of it dropping. If the power died with the door open, support the door or have a second person help before you pull the handle — and never stand directly beneath a raised door as you release it.

Step 2 — Pull the Red Handle Straight Down

Grip the red handle and pull it straight down in one firm motion. You’ll feel the lever click as the trolley separates from the door arm. Pulling down rather than at an angle keeps the mechanism from binding and makes reconnecting easier later.

Step 3 — Operate the Door by Hand

With the opener disengaged, lift the door using the lift handles or the bottom edge, raising it smoothly to fully open. A properly balanced door will glide and stay where you leave it. If it feels extremely heavy or wants to slam shut, that’s a sign the springs are doing too little — stop, lower it gently, and call a professional. When you’re finished, lower the door fully so your home stays secure.

Step 4 — Reconnect the Opener

Once power returns, re-engage the trolley. On most LiftMaster, Chamberlain, and Genie units you simply pull the red handle back toward the door (or straight down again, depending on the model) until the lever re-locks, then run the opener through one full cycle. The trolley clicks back into the carriage automatically as the door moves. If it won’t re-latch, our opener repair specialists can reset it quickly.

Why Openers and Doors Fail When You Least Expect It

Understanding why you ended up reaching for that cord helps you prevent the next emergency. Across the Phoenix metro, a handful of regional factors put unusual stress on garage systems.

Arizona heat is the first culprit. Attached garages routinely climb past 120°F in summer, which thins factory grease, hardens the nylon on rollers, and bakes the electronics inside the opener’s logic board. Power surges from monsoon storms are the second — a single surge can fry an opener’s circuit board and leave you depending on the manual release until a replacement arrives. The third is simple wear: every torsion spring is rated in cycles, and a busy family opening the door several times a day can exhaust that rating in just a few years.

Brand and age matter, too. A modern LiftMaster with myQ or a Genie running Aladdin Connect behaves differently from a twenty-year-old chain drive, and resetting a connected unit after a manual release sometimes calls for re-syncing the app. Our team works across every major brand daily, which is why we can talk a customer through a smart-opener reset as easily as an older model — and why we cover the full range in our guide to garage door home automation.

None of this is only about getting the car out. A door that opens evenly and seals tightly protects your curb appeal, reinforces your home security by latching reliably every night, and — paired with insulated panels — helps your garage hold temperature against the desert heat. The release cord is your backup; a well-maintained door is what keeps you from needing it.

Preventing the Next Garage Door Lockout

The best way to handle a manual release is to rarely need one. A few practical upgrades dramatically cut the odds of getting stuck again.

The biggest one is a battery backup opener. Many newer LiftMaster and Chamberlain models include an integrated backup battery that keeps the door working through a power outage — the exact scenario that sends most homeowners hunting for the red cord. If your opener is more than a decade old, our opener installation team can tell you whether a backup-equipped upgrade makes sense for your home.

A quality surge protector on the garage circuit is a smart, low-cost second layer, especially heading into monsoon season when lightning-driven surges take out opener boards across the Valley. And nothing beats a routine inspection: a yearly garage door tune-up catches the worn spring, fraying cable, or tired opener gear before it strands you. We keep maintenance histories for our regular clients so we can replace parts on a schedule that suits you — not on the door’s worst possible day. You’ll find more seasonal guidance on our blog.

Manual Operation vs. Calling a Professional: Making the Right Call

There’s a clear line between what’s safe to handle yourself and what calls for a trained, insured technician. Releasing a sound door, operating it by hand, and reconnecting the opener are well within any homeowner’s ability. Diagnosing why the door failed — and anything involving springs, cables, or electrical components — is not.

The reason is simple: torsion springs store enormous energy and are responsible for the most serious garage door injuries in the country every year. The same goes for cables under load and 120V opener wiring. Our certified technicians carry the tools, training, and insurance to handle those components safely, and we’d always rather you call than risk it. The table below shows where that line falls.

Safe to Do Yourself vs. Best Left to CallOrange

Task Safe to DIY? Best Left to a Pro
Pulling the release on a sound door ✓ Yes
Operating a balanced door by hand ✓ Yes
Reconnecting the opener trolley ✓ Usually We’ll reset it if it won’t latch
Diagnosing why the opener failed Limited ✓ Full diagnostic
Adjusting or replacing torsion springs ✗ Never ✓ Licensed, insured techs
Repairing or replacing cables ✗ Never ✓ Pro only
Opener circuit board or wiring repair ✗ Never ✓ Pro only
Realigning a door that’s off track ✗ Never ✓ Pro only
Annual safety & balance inspection Limited ✓ Recommended yearly

If you’re ever unsure which side of that line you’re on, the safest move is a quick call to our service team. We offer 24/7 emergency dispatch across Tempe and the greater Phoenix area, and you can always reach us through our contact page or stop by our shop on Google Maps.

Frequently Asked Questions — Garage Door Emergency Release Cord

What does the garage door emergency release cord do?

The red release cord disconnects your door from the opener’s trolley so you can raise or lower it by hand. It’s designed for power outages or opener failures, letting you operate the door manually until the opener is working again.

Is it safe to pull the release cord while the door is open?

Only with care. A raised door can fall once it’s disconnected from the opener, so support it or have a second person help, and never stand directly beneath it. Whenever possible, release the door while it’s fully closed. If you’re unsure, our Tempe team can talk you through it.

Why shouldn’t I use the release cord if a spring is broken?

Your torsion springs carry the door’s weight. If a spring snaps, the opener may be the only thing holding the door up — pulling the release then can let it crash down. If the door is crooked, extremely heavy, or you heard a loud bang, leave the cord alone and call a professional.

How do I reconnect my opener after using the release?

Once power returns, pull the red handle back toward the door (or straight down again, depending on the model) until the lever re-locks, then run the opener through one cycle. The trolley re-latches automatically as the door moves. If it won’t reconnect, our opener specialists can reset it the same day.

Will the emergency release work during a power outage?

Yes — that’s exactly what it’s for. The release is purely mechanical and needs no electricity. Many newer LiftMaster and Chamberlain openers also include a battery backup that keeps the door powered through an outage. Ask our service team whether a backup-equipped opener is right for your home.

My release cord is stuck or won’t reconnect — what now?

Don’t force it. A stuck release can point to a bent trolley, a worn lever, or a deeper mechanical issue. Our technicians can inspect and reset it safely — book a visit or find us on Google Maps.

Keep Your Family Moving When the Power Cuts Out

A dead opener doesn’t have to mean a trapped car or a missed morning. Knowing how your garage door emergency release cord works — and, just as importantly, knowing the one time not to touch it — turns a stressful surprise into a thirty-second fix. The red handle is a remarkably well-engineered safety feature, and a little familiarity with it is one of the most useful things you can know about the largest moving part of your home. For the bigger picture on keeping that system dependable year-round, our breakdown of what happens during a professional garage door tune-up is a natural next read.

At CallOrange Garage Door Repair, every service call is handled by background-checked, factory-trained technicians who work on LiftMaster, Chamberlain, and Genie systems throughout Tempe. Whether you need a fast opener repair, a torsion spring replacement, or just a second opinion on whether that cord is safe to pull, we’re a phone call away. Call us at (480) 690-3344, seven days a week from 7 AM to 11 PM, with 24/7 emergency dispatch. You can schedule service online in under a minute, or visit our Tempe location on Google Maps at 2101 E Broadway Rd, Suite 3. When the power cuts out, we’ll make sure your door — and your family — keeps moving.